Looking for an ACH (Automatic Clearing House) payment method. Dwolla is one of the most popular payment methods.
Dwolla API is providing the full detailed documentation about the payment integration methods. In this blog post, we are going to discuss the “Receive money from your users“. Check the official documentation about this section. This blog post is using this GitHub library for integration.
Let’s start with the integration steps.
1. Create a sandbox account
Before starting the code and test your code. You required an API Key and secret. So you need to register a sandbox account. After creating a sandbox account, you’ll obtain your API Key and Secret, which are used to obtain an OAuth access token. An access token is required in order to authenticate against the Dwolla API.
2. Import the DwollaSwagger SDK
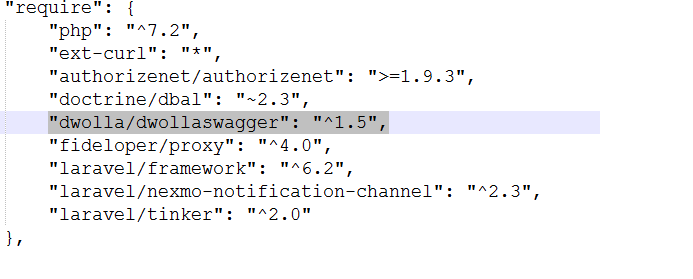
Update your Laravel composer.json file and add the following JSON code and run update composer command from the command prompt.
These lines must under the ‘require‘ array key.
"dwolla/dwollaswagger": "^1.5",
3. Setup the integration of Laravel environment variables.
Update the Laravel services.php file under the config folder. Add the following code.
'dwolla' => [
		'key' => env('ACH_API_KEY'),
		'secret' => env('ACH_API_SECRET'),
		'env_url' => env('ACH_API_ENV'),
		'fund_id' => env('ACH_API_FUND_ID')
	]
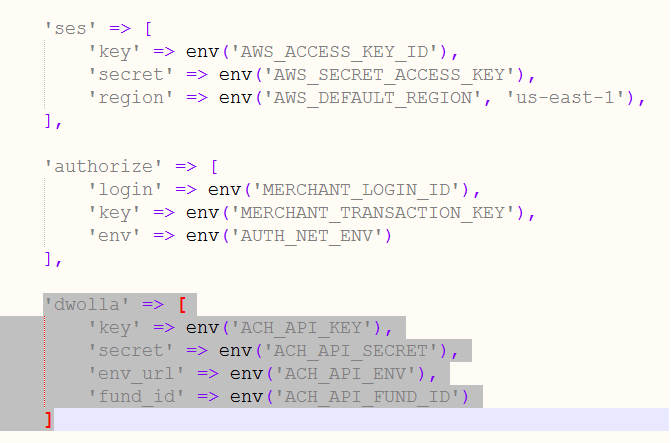
Now add the Dwolla API keys details in Laravel .env file.
The following API details are just for example. So replace with correct API details.
ACH_API_KEY=your_key_id
ACH_API_SECRET=your_secret_key
ACH_API_ENV=https://api-sandbox.dwolla.com
ACH_API_FUND_ID=master_account_fund_source_id
4. Get OAuth access token
The auth access token verifies your API session. Once an application is registered you will obtain your client_id and client_secret, which will be used to identify your application when calling the Dwolla API. See the controller class code at the bottom. It includes a full working code.
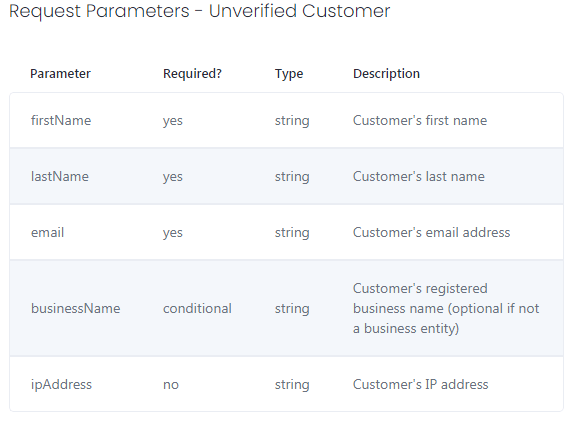
5. Create a customer on the Dwolla dashboard
Before your end-user can send funds, they must be created as a Customer via the Dwolla API. The pay-ins funds flow is flexible in terms of choosing a Customer type to onboard, as both the unverified Customer and verified Customer types are eligible to send funds.
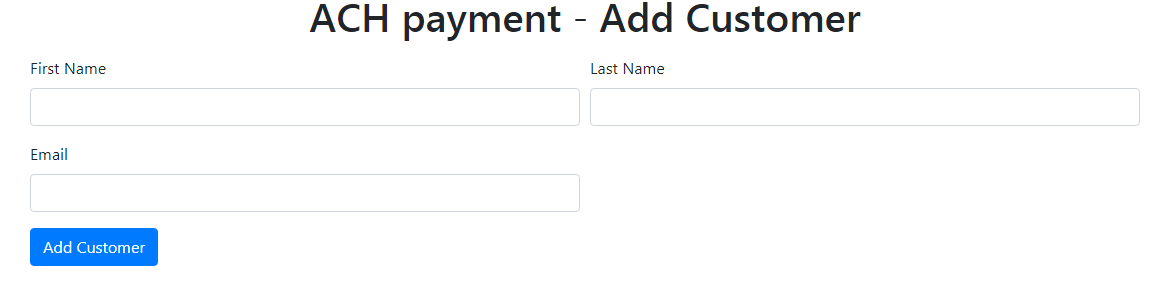
This code for the Laravel view file. Create a view in
resources/views/addAchCustomer.blade.php
<div class="container">
			<div class="row align-items-center">
				<div class="col">
					<h1 class="mb-3 text-center">ACH payment - Add Customer</h1>

					@if (Session::has('success'))
						<div class="alert alert-success">{{ Session::get('success') }}</div>
					@endif

					@if (Session::has('error'))
						<div class="alert alert-danger">{{ Session::get('error') }}</div>
					@endif

					@if ($errors->any())
						<div class="alert alert-danger mb-3">
							<ul class="error-list">
								@foreach ($errors->all() as $error)
									<li>{{ $error }}</li>
								@endforeach
							</ul>
						</div>
					@endif

					<form method="post" action="{{ url('process-ach-customer') }}">
						@csrf
						<div class="form-row">
							<div class="form-group col-md-6">
								<label for="achFirstName" class="control-label">First Name</label>
								<input type="text" class="form-control" id="achFirstName" name="achFirstName" placeholder="" maxlength="100">

							</div>
							<div class="form-group col-md-6">
								<label for="achLastName" class="control-label">Last Name</label>
								<input type="text" class="form-control" id="achLastName" name="achLastName" placeholder="" maxlength="100">

							</div>
						</div>
						<div class="form-row">
							<div class="form-group col-md-6">
								<label for="achEmail" class="control-label">Email</label>
								<input type="email" class="form-control" id="achEmail" name="achEmail" placeholder="" maxlength="100">

							</div>

						</div>
						<div class="form-group row">
							<div class="col-sm-offset-4 col-sm-8">
								<button type="submit" class="btn btn-primary">Add Customer</button>
							</div>
						</div>
					</form>
				</div>
			</div>
		</div>
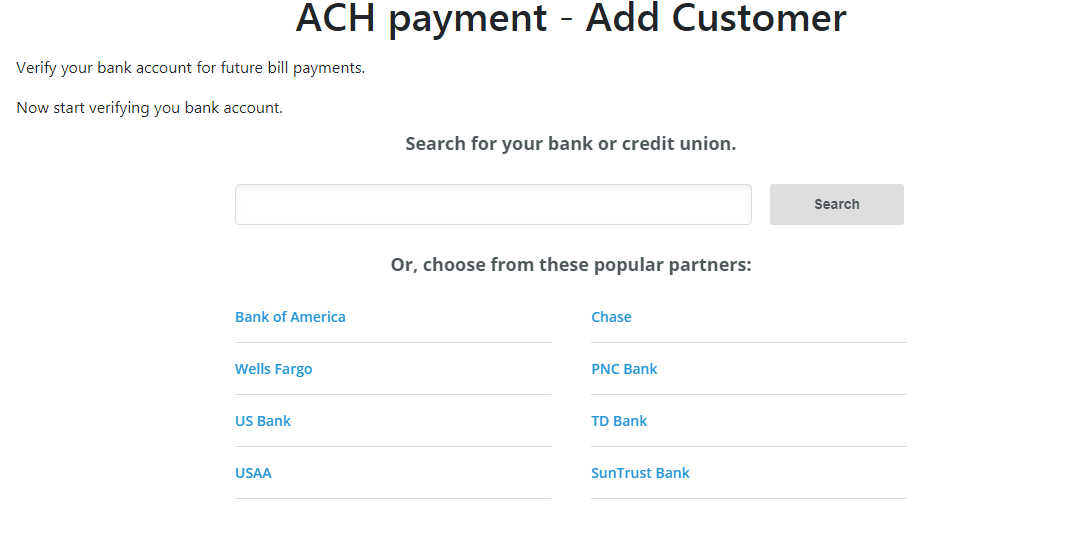
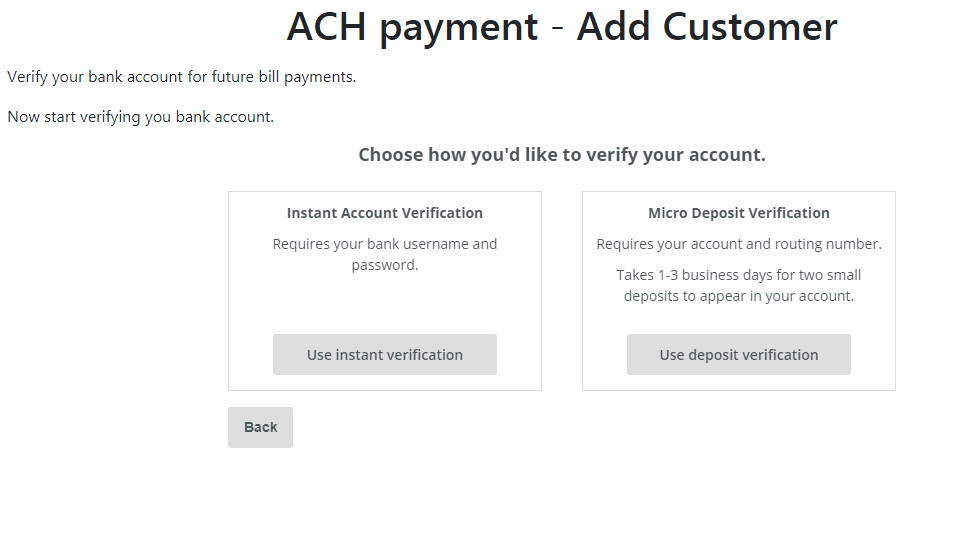
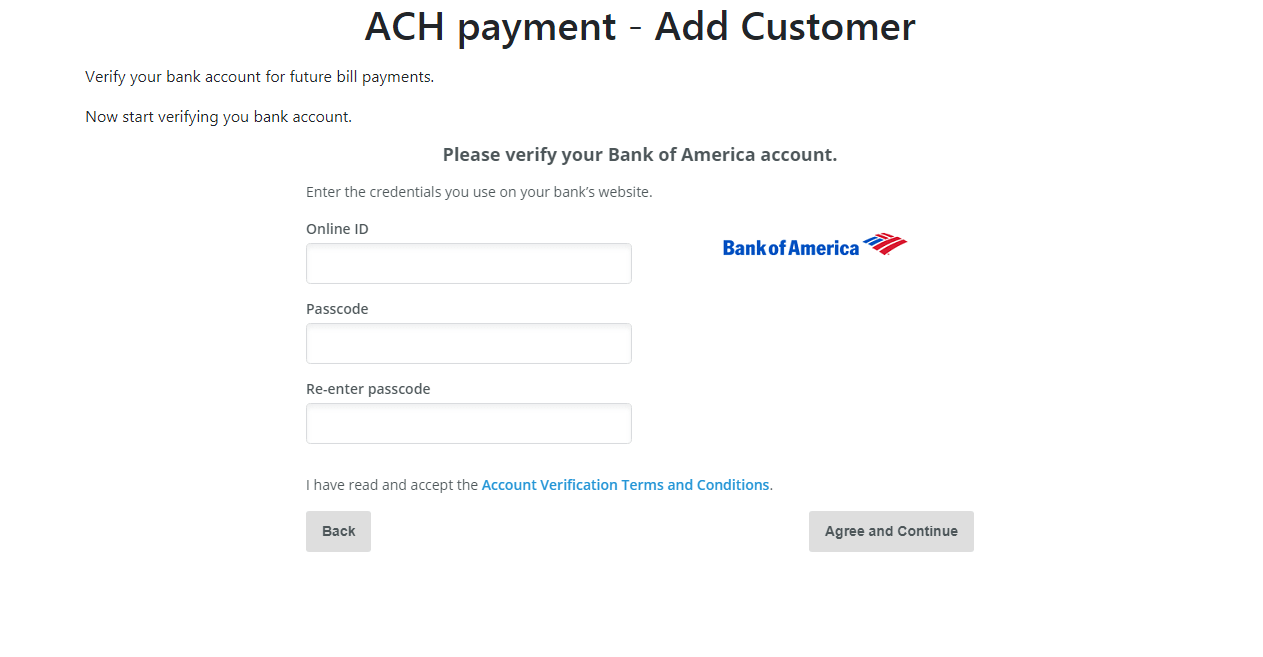
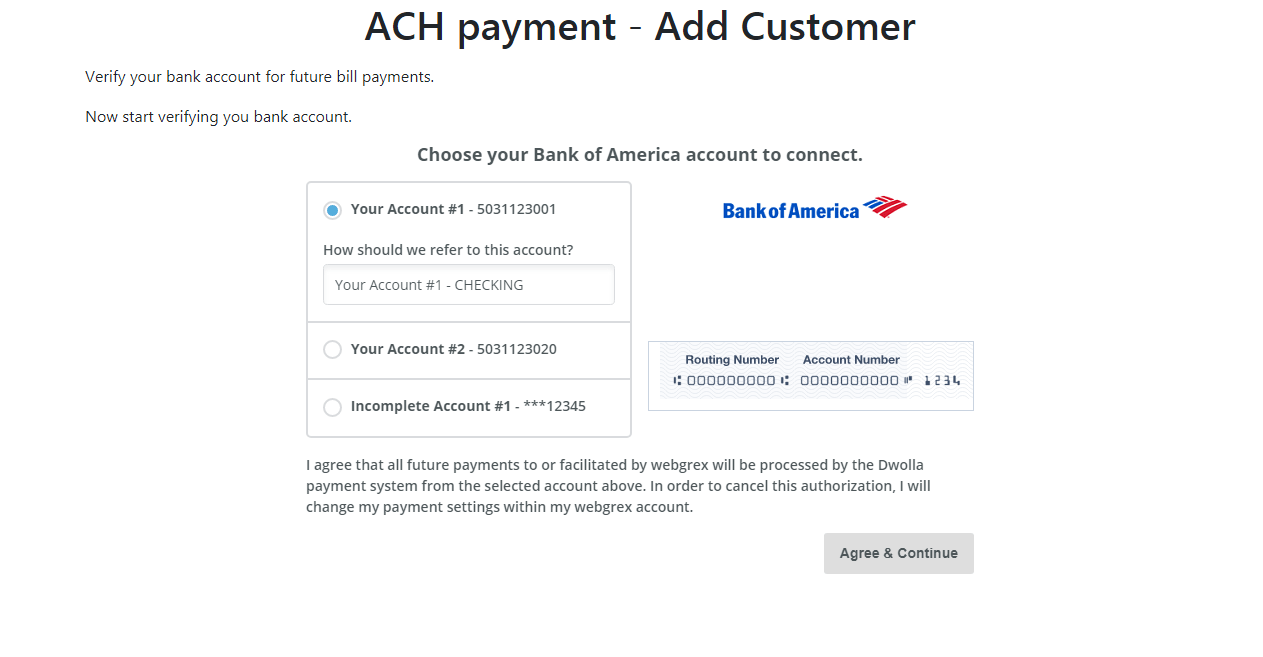
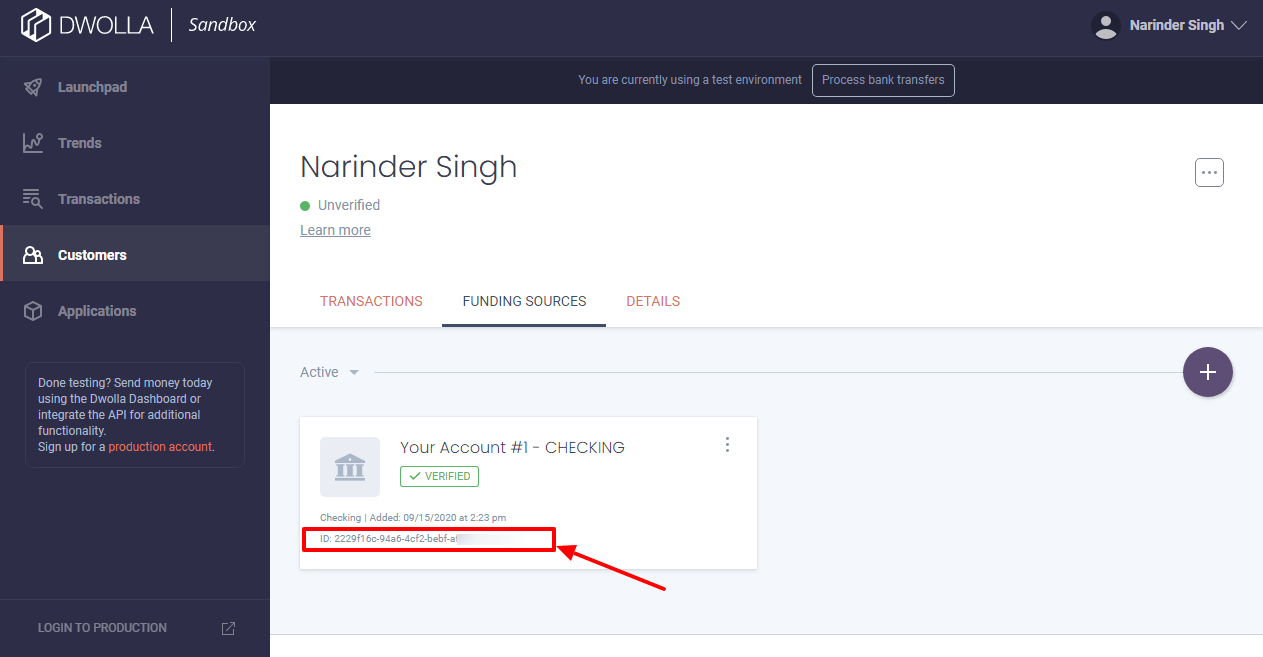
6. Verify bank account
There are three ways of adding a bank to a Customer with the Dwolla API. Check the screenshot below or check this link.

Within Dwolla, the sending party must always have a verified funding source. Since your Customer is the one sending funds, they will need to both add and verify their bank funding source before being eligible to send funds.
For instance verification widget. Use this script source in your view template. https://cdn.dwolla.com/1/dwolla.js
This code for the Laravel view file. Create a view in
resources/views/verifyAchBankAccount.blade.php
<div class="container">
			<div class="row align-items-center">
				<div class="col">
					<h1 class="mb-3 text-center">ACH payment - Add Customer</h1>

					@if (Session::has('success'))
						<div class="alert alert-success">{{ Session::get('success') }}</div>
					@endif

					@if (Session::has('error'))
						<div class="alert alert-danger">{{ Session::get('error') }}</div>
					@endif

					@if( isset($fund_sources[0]->id) )
						<p>Your bank account has verified and attached for ACH payments.</p>
						<p>
							<a class="btn btn-primary" href="{{ url('ach-payment') }}">Proceed for Payment</a>
						</p>
					@else

					<p>Verify your bank account for future bill payments.</p>
					<p id="iav_verify_btn">
						<button class="btn btn-primary" type="button" id="start" value="Add Bank">Start Verify Bank Account</button>
					</p>
					<p style="text-align: right; display:none" id="iav_verify_btn_done">
						<a class="btn btn-primary" href="{{ url('ach-payment') }}">Proceed for Payment</a>
					</p>
					<div id="iavContainerLoader"></div>
					<div id="iavContainer"></div>
					<div id="logs"></div>
					@endif
				</div>
			</div>
		</div>
The following javascript code for the bank verification view file. It’s depended on you and your coding style. How you want to use this code, direct in the view file, or using a master template. But I suggest using it in the view file at the bottom because we are using variable ‘{{ $fsToken }}’ using in this javascript.
		function dwollaIAVcallback(err, res) {
		  var $div = $("<div class=\"alert alert-info\"/>");
		  var logValue = {
			error: err,
			response: res,
		  };

		  if(logValue.response._links["funding-source"].href){
			$div.text('Funding source added successfully');
			$('#iav_verify_btn_done').show();
			$('#iav_verify_btn').hide();
		  }
		  if(logValue.error.message){
			$div.text(logValue.error.message);
			$('#iav_verify_btn_done').hide();
			$('#iav_verify_btn').show();
		  }
		  console.log(logValue);
		  $("#logs").append($div);
		  $('#iavContainerLoader').html('');
		}
		$('#start').click(function() {
			$('#iav_verify_btn').hide();
			$('#iavContainerLoader').html('Now start verifying you bank account.');
			var iavToken = '{{ $fsToken }}';
			dwolla.configure('sandbox');
			dwolla.iav.start(iavToken, {
			  container: 'iavContainer',
			  stylesheets: [
				'https://fonts.googleapis.com/css?family=Lato&subset=latin,latin-ext'
			  ],
			  backButton: 'true',
			  microDeposits: 'true',
			  fallbackToMicroDeposits: 'true'//(fallbackToMicroDeposits.value === 'true')
			}, dwollaIAVcallback);

		});
7. Retrieving Funding Sources
Now that you’ve created a Customer and associated its funding source, you are close to being able to initiate your first transfer. The transfer requires the following information:
- A funding source to pull the funds from (your Customer’s linked bank funding source)
- A funding source to push the funds to (your Dwolla Master Account’s linked bank funding source)
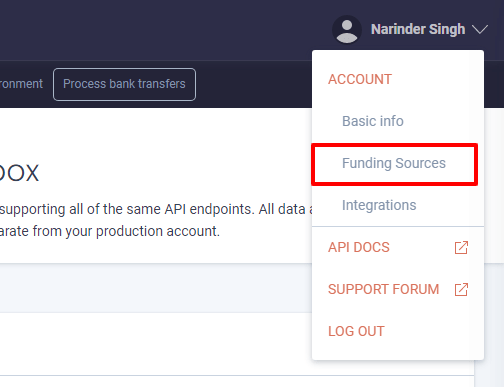
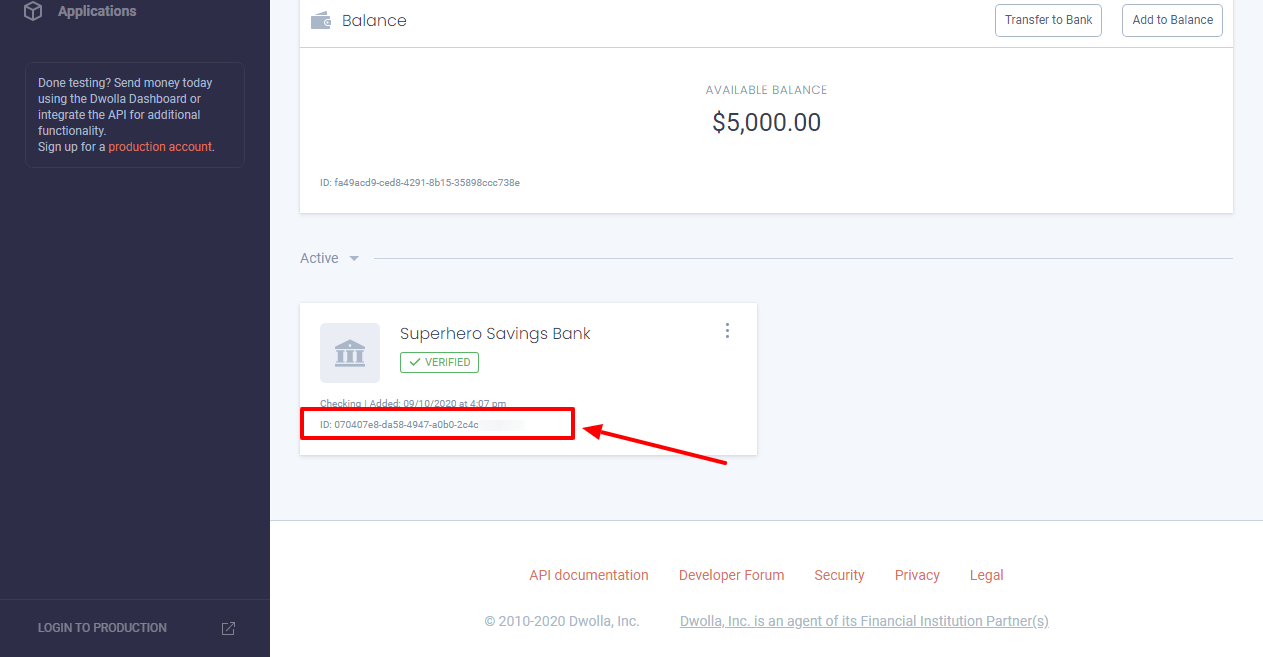
8. Retrieve your Dwolla Master Account Funding Sources
Access the master account funding source. Login on your sandbox account and get the funding source. Click on the right top “Account” tab and click on the funding source. See the screenshot below.
9. Initiating a Transfer
To initiate a transfer, we will need to specify the source and destination funding source URLs in the _links parameter.
- Source – Your Customer’s Bank Funding Source
- Destination – Your Dwolla Master Account Bank Funding Source
To simulate paymentACH processing in the Dwolla Sandbox environment, navigate to the Sandbox Dashboard. From here, you will want to click the “Process Bank Transfers” button on the top of the screen. Your Sandbox transfer will be moved out of pending status and moved to a processed status.
Create a controller class app/Http/Controllers/AchPayment.php
<?php
namespace App\Http\Controllers;
use Illuminate\Http\Request;
use DwollaSwagger;
use Illuminate\Support\Facades\Validator;
use Illuminate\Support\Facades\Redirect;
class AchPayment extends Controller {
public function addAchCustomer(){
return view('addAchCustomer');
}
public function processAchCustomer(Request $request){
$rules = array(
'achFirstName' => 'required|regex:/^[a-zA-Z\s]+$/',
'achLastName' => 'required|regex:/^[a-zA-Z\s]+$/',
'achEmail' => 'required|email',
);
$validatorMesssages = array(
'achFirstName.required' => 'First name is required.',
'achLastName.required' => 'Last name is required.',
'achEmail.required' => 'Email address is required.',
'achEmail.email' => 'Enter valid email address.',
);
$validator = Validator::make($request->all(), $rules, $validatorMesssages);
if ($validator->fails()) {
return redirect('add-ach-customer')
->withErrors($validator)
->withInput();
} else {
// generate Dwolla API access token.
$this->generateAchAPIToken();
$dwolla_api_env_url = config('services.dwolla.env_url');
$apiClient = new DwollaSwagger\ApiClient($dwolla_api_env_url);
$customersApi = new DwollaSwagger\CustomersApi($apiClient);
$customers = $customersApi->_list(1,0,null, null, null ,$request->achEmail);
if( $customers->total ){
$ach_customer_id = $customers->_embedded->{'customers'}[0]->id;
$customers->_embedded->{'customers'}[0]->email;
}else{
$customer = $customersApi->create([
'firstName' => $request->achFirstName,
'lastName' => $request->achLastName,
'email' => $request->achEmail,
'ipAddress' => $_SERVER['REMOTE_ADDR']
]);
$customers = $customersApi->_list(1,0,null, null, null ,$request->achEmail);
$ach_customer_id = $customers->_embedded->{'customers'}[0]->id;
}
//print_r($customers);
// save returned $ach_customer_id to database for future access.
//echo $ach_customer_id;
\Session::flash('success', "ACH customer account added. Now verify your bank.");
return Redirect::to('ach-verify-bank');
}
}
public function verifyAchCustomerBank(){
// generate Dwolla API access token.
$this->generateAchAPIToken();
$dwolla_api_env_url = config('services.dwolla.env_url');
$apiClient = new DwollaSwagger\ApiClient($dwolla_api_env_url);
$customersApi = new DwollaSwagger\CustomersApi($apiClient);
$fundingsourcesApi = new DwollaSwagger\FundingsourcesApi($apiClient);
$ach_customer_id = '6743eabc-cd6b-4788-a8fc-bc2fdb62f693'; // get saved ach_customer_id from database;
if($ach_customer_id != ''){
$customer_fund_source = $fundingsourcesApi->getCustomerFundingSources($ach_customer_id);
if( isset( $customer_fund_source->_embedded->{'funding-sources'}[0]->id )){
$fund_sources = $customer_fund_source->_embedded->{'funding-sources'};
return view('verifyAchBankAccount', ['fund_sources'=> $fund_sources, 'fsToken'=> '']);
} else {
$fsToken = $customersApi->getCustomerIavToken($dwolla_api_env_url."/customers/".$ach_customer_id);
return view('verifyAchBankAccount', ['fsToken'=> $fsToken->token]);
}
}else{
\Session::flash('error', "ACH customer account is not added.");
return Redirect::to('add-ach-customer');
}
}
public function achPaymentProcess(){
return view('achPaymentProcess');
}
public function achPaymentSubmit(Request $request){
$rules = array(
'paymentAmount' => 'required|integer',
);
$validatorMesssages = array(
'paymentAmount.required' => 'Payment amount is required.',
'paymentAmount.integer' => 'Payment amount must be a valid number.',
);
$validator = Validator::make($request->all(), $rules, $validatorMesssages);
if ($validator->fails()) {
return redirect('ach-payment-process')
->withErrors($validator)
->withInput();
} else {
// generate Dwolla API access token.
$this->generateAchAPIToken();
$ach_customer_id = '6743eabc-cd6b-4788-a8fc-bc2fdb62f693'; // get saved ach_customer_id from database;
$dwolla_api_env_url = config('services.dwolla.env_url');
$dwolla_api_fund_id = config('services.dwolla.fund_id');
$apiClient = new DwollaSwagger\ApiClient($dwolla_api_env_url);
$customersApi = new DwollaSwagger\CustomersApi($apiClient);
$fundingsourcesApi = new DwollaSwagger\FundingsourcesApi($apiClient);
$customer_fund_source = $fundingsourcesApi->getCustomerFundingSources($ach_customer_id);
if( isset( $customer_fund_source->_embedded->{'funding-sources'}[0]->id )){
$fund_sources = $customer_fund_source->_embedded->{'funding-sources'};
$transfer_request = array ( '_links' => array ( 'source' =>
array ( 'href' => $dwolla_api_env_url.'/funding-sources/'.$fund_sources[0]->id, ),
'destination' =>
array ( 'href' => $dwolla_api_env_url.'/funding-sources/'.$dwolla_api_fund_id,
), ),
'amount' => array ( 'currency' => 'USD', 'value' => $request->paymentAmount ) );
$transferApi = new DwollaSwagger\TransfersApi($apiClient);
$transferUrl = $transferApi->create($transfer_request);
if($transferUrl != ''){
$transferData = $transferApi->byId($transferUrl);
// save $transferData->id to database and send email notification;
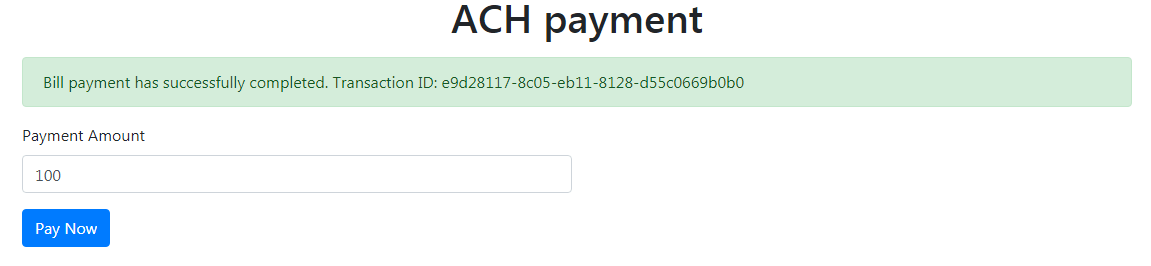
\Session::flash('success', "Bill payment has successfully completed. Transaction ID: " .$transferData->id);
return Redirect::to('ach-payment-process');
}else{
$this->payment_failed_email($user);
\Session::flash('error', "Bill payment has failed. Please try again.");
return Redirect::to('ach-payment-process');
}
}else{
$this->payment_failed_email($user);
\Session::flash('error', "Your bank account not verified.");
return Redirect::to('ach-payment-process');
}
}
}
private function generateAchAPIToken(){
$dwolla_api_key = config('services.dwolla.key');
$dwolla_api_secret = config('services.dwolla.secret');
$dwolla_api_env_url = config('services.dwolla.env_url');
$basic_credentials = base64_encode($dwolla_api_key.':'.$dwolla_api_secret);
$ch = curl_init($dwolla_api_env_url.'/token');
curl_setopt($ch, CURLOPT_HTTPHEADER, array('Authorization: Basic '.$basic_credentials, 'Content-Type: application/x-www-form-urlencoded;charset=UTF-8'));
curl_setopt($ch, CURLOPT_POSTFIELDS, 'grant_type=client_credentials');
curl_setopt($ch, CURLOPT_RETURNTRANSFER, true);
$data = json_decode(curl_exec($ch));
$token= $data->access_token;
DwollaSwagger\Configuration::$access_token = $token;
curl_close($ch);
}
}
This code for the Laravel view file. Create a view in
resources/views/achPaymentProcess.blade.php
<div class="container">
			<div class="row align-items-center">
				<div class="col">
					<h1 class="mb-3 text-center">ACH payment</h1>

					@if (Session::has('success'))
						<div class="alert alert-success">{{ Session::get('success') }}</div>
					@endif

					@if (Session::has('error'))
						<div class="alert alert-danger">{{ Session::get('error') }}</div>
					@endif

					@if ($errors->any())
						<div class="alert alert-danger mb-3">
							<ul class="error-list">
								@foreach ($errors->all() as $error)
									<li>{{ $error }}</li>
								@endforeach
							</ul>
						</div>
					@endif

					<form method="post" action="{{ url('ach-payment-submit') }}">
						@csrf
						<div class="form-row">
							<div class="form-group col-md-6">
								<label for="paymentAmount" class="control-label">Payment Amount</label>
								<input type="number" class="form-control" id="paymentAmount" name="paymentAmount" value="100" placeholder="" maxlength="6">
							</div>
						</div>
						<div class="form-group row">
							<div class="col-sm-offset-4 col-sm-8">
								<button type="submit" class="btn btn-primary">Pay Now</button>
							</div>
						</div>
					</form>
				</div>
			</div>
		</div>
10. How to test it?
To test and validate this code. The following code in the web.php file under the routes folder.
Route::get('add-ach-customer', 'AchPayment@addAchCustomer');
Route::post('process-ach-customer', 'AchPayment@processAchCustomer');
Route::get('ach-verify-bank', 'AchPayment@verifyAchCustomerBank');
Route::get('ach-payment-process', 'AchPayment@achPaymentProcess');
Route::post('ach-payment-submit', 'AchPayment@achPaymentSubmit');
If you are testing on localhost. Run PHP artisan serve command on cmd panel and URL on the browser.
If you are testing it on a live server. Simply run the URL on the browser.
http://domainName/add-ach-customer.
Thank you read the full blog. I hope it will help.


Comments
the access token is null.
Getting this error:
*Attempt to read property “access_token” on null*
Author
Please check API details first. Then review, whether your customer has a verified bank account. Check Point number 6 from the blog post. Have you replaced the code in app/Http/Controllers/AchPayment.php on line number 136? you need to replace it with your verified customer id. It is saved in the database.